How to compare two xml files using CreateXMLfromFile Method

In order to compare two xml files in QTP we use the "XMLUtil Object" which is used to access and return XML objects.The Associated Methods for this object is CreateXML Method & CreateXMLfromFile Method.


1. CreateXML Method: This method is used to create and return an object of the type XMLData. If a root name is specified i.e path of the xml file, a new document is created containing the specified root tag.

2. CreateXMLFromFile Method: This method is used to create and return an object of type XMLData

Example: Below is an example which creates an XML object and uses it to load an XML file.

CreateXML Method
Set XMLObj = XMLUtil.CreateXML()
XMLObj.LoadFile("E:\Environment.xml")

Using this method we will write a script to compare two xml files and return the result in a result.xml file.
'assigining the path of the xml file to a variable

xmlFile1 = "E:\Perspectives_FrameWork\Environment.xml"
xmlFile2 = "E:\Perspectives_FrameWork\Environment 1.xml"

'Creates and returns an object of type XMLData

Set objxml1 = XMLUtil.CreateXML()
Set objxml2 = XMLUtil.CreateXML()

'Loading the c=xml file

objxml1.LoadFile (xmlFile1)
objxml2.LoadFile (xmlFile2)

' Comparing the two xml files and setting the value either 1 or 0 to the variable
Result = objXML1.compare(objXML2, objResultsXML)

If Result = 1 Then
MsgBox "XML Files Match"
Else
MsgBox "XML Files do not match"

'saving the result xml file

objResultsXML.savefile ("E:\results.xml")

End If

CreateXMLfromFile Method

This method is used to create and return an object of type XMLData

Example: Below is the example given which creates an XML object and loads the XML file Environment.xml into it.

Set XMLObj = XMLUtil.CreateXMLFromFile("E:\Environment.xml")

Below is the script to compare two xml files named Environment and Environment 1.
' using a CreateXMLfromFile Method creates an XML object and loads the XML file specified into it

Set objxml1 = XMLUtil.CreateXMLFromFile("E:\Perspectives_FrameWork\Environment.xml")
Set objxml2 = XMLUtil.CreateXMLFromFile("E:\Perspectives_FrameWork\Environment 1.xml")

' Comparing the two xml files and setting the value either 1 or 0 to the variable

Result = objXML1.compare(objXML2, objResultsXML)

If Result = 1 Then
Msgbox "XML Files Match"
Else
Msgbox "XML Files do not match"
objResultsXML.savefile ("E:\results.xml")
End If

How to associate Function Libraries to a Test in QTP using Script?

Associating function libraries to a test in QTP is with respect to user defined functions which means either you or some one else are the owners of the functions and have rights to manage those functions. When it comes to writing scripts and running the test and that too in a frame work architecture every script is converted in to a function and relevant functions are called into the test script.


Functions in this context is the user defined and associating the function libraries to a test in QTP is by the two mentioned methods.

1. Using the feature of QTP
2. Using a Script.

Associating a Function Library using a Script

Step 1: Convert a script into a function, pass the necessary arguments, prepare the appropriate documentation for the function.

Step 2: Cut the function from the main script and open a note pad and paste the function in to the note pad and save it as a .vbs file in the appropriate folder.

Let us take the previous example of invoking/Login into the Flight Reservation application. We will create a library function called Login_FR and associate the function into QTP and it can be viewed by navigating to Resources and Associated Library Functions. When this is done you can just simply put the function call into the main script and run the test and you can see that QTP passes the username and password into the Flight Reservation application and you main script will have only one line of code and creating functions is useful for maintenance of the scripts.

Public Function LoginFR(byval username, byval password)

Dialog("Login").Activate
Dialog("Login").WinEdit("Agent Name:").Set username
Dialog("Login").WinEdit("Password:").Set password
Dialog("Login").WinButton("OK").Click

End Function

What you will do is cut this function from the main script and paste it in a note pad and save it as Login_FR.vbs

Associate Function Libraries to a Test in QTP 9.2

Associating function libraries to a test in QTP is with respect to user defined functions which means either you or some one else are the owners of the functions and have rights to manage those functions. When it comes to writing scripts and running the test and that too in a frame work architecture every script is converted in to a function and relevant functions are called into the test script.

Functions in this context is the user defined and associating the function libraries to a test in QTP is by the two mentioned methods.


1. Using the feature of QTP
2. Using a Script.
Using the feature of QTP

In order to associate a function library using the feature of QTP we need to navigate to the desired feature of the QTP
File -> Settings -> Resources


To associate a function library you need to click the + sign which is for adding function library files from external location.

Viewing the Associate Function

In order to view the associated function library for the test you need to navigate in this manner

Resources -> Associated Library Functions


You can see the associated function which you have just now added to the test.

What is Update Run Mode in QTP

Update Run Mode updates the test object description, Checkpoints properties, active screen images and values.


How to navigate to update run mode?


1. Automation -> Update Run Mode
2. Object Repository ->Update from Application. This updates the properties of objects of the application which are recorded.
2. Click update run mode button next Stop button in the tool bar.

When the Smart Identification properties are configured then click update run mode and then click run the properties and values will be updated in the object repository.

If you have not installed Microsoft debugger then update run mode feature will be disabled in QTP and for this you need to make changes in the Object Identification Dialog Box as mentioned in the previous post.

What is Smart Identification in QTP and explain it

Smart Identification is a unique feature of QTP that comes into picture if the following conditions are satisfied.

1. When Normal Object Identification Fails

2. When the Enable Smart Identification check box is checked in the Object Identification Dialog Box.


Smart Identification (SI) works on the principle of filtration.

When the check box is selected and the configure button is clicked another dialog box is opened where you can set the Base Filter properties which are mandatory and Optional Filter Properties based on which the object is identified. When the properties are configured in the Smart Identification mode then the properties are not changed in the object repository for that object for this we need to run the script/test in Update Run Mode.

If you feel that this also failed then you can use one more property of Smart Identification known as "Ordinal Identifier" which makes use of the two types of properties for object identification. They are

1. Index
2. Location.

QTP traces the location of the object and assigns a unique Id which can be used for object Identification.

If all these fails for Object Identification then the only solution is to do descriptive programming.

Explain the what does "createobject" mean with an example

CreateObject creates an object to interact with the specified library.


For Example If we want to interact with internet explorer to launch IE then we use create object and the library name.

Set IE CreateObject("InternetExplorer.Application")
IE.visible True
IE.Navigate http://www.google.com

Here IE is an object which is created to interact with the Internet Explorer Library.

Like wise for any library

Set xlapp CreateObject("Excel.Application")
Set QTapp CreateObject("QuickTest.Application")

What is the difference between a check point and output value?

Checkpoint compare the expected result of the Test object with the Actual result from the run time object and returns a pass or fail to the test result.

Output value retrieves the value of an Run Time object and returns to the test result.

Differentiate the Local Object Repository and Shared Object repository types of QTP

There are two types of Object Repositories in QTP namely

1. Local Object Repository (.mtr)
2. Shared object Repository (.tsr)


1. Local Object Repository : Local Object Repository is for that particular action i.e you have learned objects into the repository for that test or action and you have the privilege to edit the object properties and values and this is stored in that test file. you cannot use this repository with other tests.

2. Local Object Repository : Shared Object Repository is a global repository which can be used by any test. Its like a centralized placed where all information about the objects are stored and can be associated to any test. The advantage of Shared Object Repository is that for multiple actions or test you can use the same Object Repository and this has to be associated to the current test or action so that the object identification takes place.

When you associate a shared object into your current test then all the objects will be read only and you cannot make any changes to the object properties and by enabling editing you can make changes to the repository but if you want to save the repository then you have to save as a new copy.

What is the command in QTP to invoke IE Browser?

To Invoke Browser in QTP there are three ways to invoke IE browser and launch a website from QTP. To be very specific to your question to invoke only IE browser in QTP you can do it but it will only open a blank IE browser. In order to do this you need to use the method called as "InvokeApplication"


Syntax

InvokeApplication "Path"

Example


Invokeapplication "C:Program Files\Internet Explorer\iexplore.exe"

Invokeapplication "C:Program Files\Mercury Interactive\QuickTest Professional\bin\QTPro.exe" 'This will invoke QTP.

There are other ways to Invoke browser in QTP and also a particular web site like google.com

1. We will use the "SystemUtil" object associated with a "Run" method

Syntax

SystemUtil.Run "url"

Example

SystemUtil.Run http://www.google.com

Here when you run this line of code systemutil.run executes a method called run by which the IE browser is opened and also the url mentioned is launched. This is useful when you want QTP to directly launch the website you want in a single step.

2. When you want to invoke IE and then launch a url through script you can use the object function library.

Set IE CreateObject("InternetExplorer.Application")
IE.Visible True
IE.Navigate http://www.google.com

How to execute a qtp script from command prompt?

It is very much possible to launch a QTP test from Command prompt and then run it. The script to open QTP and then load the test into QTP and run the test is given in the "Quick Test Automation reference" file which is given in the Documentation Folder.


The path to get the file and the code is "C:Program FilesMercury InteractiveQuickTest ProfessionalhelpAutomationObjectModel.chm"

I have taken this script from this file and changed the path of my test to be loaded and saved the file as a .vbs and executed it from the command prompt.

The script is given below for quick reference

Dim qtApp 'As QuickTest.Application ' Declare the Application object variable
Dim qtTest 'As QuickTest.Test ' Declare a Test object variable
Dim qtResultsOpt 'As QuickTest.RunResultsOptions ' Declare a Run Results Options object variable

Set qtApp = CreateObject("QuickTest.Application") ' Create the Application object


qtApp.Launch ' Start QuickTest
qtApp.Visible = True ' Make the QuickTest application visible

' Set QuickTest run options


qtApp.Options.Run.ImageCaptureForTestResults = "OnError"
qtApp.Options.Run.RunMode = "Fast"

qtApp.Options.Run.ViewResults = False
qtApp.Open "E:\Test Scripts\actiTIME FunctionCalls Script", True ' Open the test in read-only mode


' set run settings for the test


Set qtTest = qtApp.Test

qtTest.Settings.Run.IterationMode = "rngIterations" ' Run only iterations 2 to 4
qtTest.Settings.Run.StartIteration = 2
qtTest.Settings.Run.EndIteration = 4
qtTest.Settings.Run.OnError = "NextStep" ' Instruct QuickTest to perform next step when error occurs

Set qtResultsOpt = CreateObject("QuickTest.RunResultsOptions") ' Create the Run Results Options object


qtResultsOpt.ResultsLocation = "E:\Test Scripts\actiTIME FunctionCalls Script\Res1" ' Set the results location
qtTest.Run qtResultsOpt ' Run the test

MsgBox qtTest.LastRunResults.Status ' Check the results of the test run

qtTest.Close ' Close the test

Set qtResultsOpt = Nothing ' Release the Run Results Options object

Set qtTest = Nothing ' Release the Test object
Set qtApp = Nothing ' Release the Application object


For this you should have created a test with some actions in QTP and saved it then you need to specify the path of the test correctly at qtapp.Open

Save this file in a desired location with a .vbs extension.

Launch command prompt by going to run and type cmd and click enter.

The command prompt is visible. Since i store this .vbs file in E drive i have changed the directory in command prompt to E drive

C:\>E: and press enter

E:\> "This will be displayed" now enter the vbs file and click enter

E:\>testrun.vbs and clicked enter

Now the QTP will automatically launch load the specified test and runs it and gives you a message box prompt saying passed after the test is completed.

When QTP throws "verify that parent properties match an object currently displayed in your application." How to resolve issue

The reason for QTP throwing this error "verify that parent properties match an object currently displayed in your application." is that when the test is running the object identification could not happen i.e the object property and values of the test object while recording and the runtime object properties and Values did not match and hence the error was thrown.


When ever there is an object identification problem QTP throws these kinds of errors.

To resolve this you need to open the Object repository and locate the object which throws the error and click the "Highlight in Application" icon and see whether that object is identified in the application under test. If identified then there is a problem in the script. You have to correct the script to see whether the methods associated with the object is correct or not.

If the object is not highlighted in the AUT then try adding that object from the application to the repository and run the test. If the objects are dynamic then you need to use regular expressions for that property.

If you are using Descriptive programming then see that the properties given for that object are correct or not.

To sum it up QTP throws these kind of errors when the Object is not identified during run time. Its an Object Identification Problem. There are ways to handle this if normal identification does not resolve the problem. Use Smart identification where you can set the Base filter values and optional Filter values and also Ordinal Identifiers where in you can set the Index or location of the object.

How to capture dynamically changing data in web page through scripting in QTP along with any sample working code

To capture the value of a dynamic object in a web application GetROProperty method is executed. In order to capture the value of an object and that too of a dynamic object then we will use the GetROProperty which means Get Run Time Object Property and we need to decide which property we want to capture. This can be text innertext etc.


I would list down a sample code for gmail to count unread emails from any account.

Since the inbox count is dynamic and ever changing from account to account i have used descriptive programming so that this piece of code can be run for any gmail account.

The prerequisite is that you log in to your gmail account and then run this script

This script prints the number of unread emails in the inbox.

inboxcount = Browser("title: Gmail.*").Page("title: Gmail.*").Link("innertext: Inbox.*").getroproperty("innertext")
If inboxcount = "Inbox" Then
Print "No Unread Emails"
ExitAction

Else

emailcount = replace(inboxcount, "Inbox","") 'replaces inbox with space
emailcount = trim(emailcount) 'removes all the spaces
emailcount = replace(emailcount, "(","")
emailcount = replace(emailcount, ")","")

Print "You have "&emailcount& " unread emails in your inbox"

End If

How to convert a local object repository into a shared object repository?

If we are working in a frame work environment then creation of Local Object Repository will create object identification issues when different people want to use the same script on a different machine you recorded or wrote and if the objects in your script are from the local object repository then identification problem persist. The solution to this is to create the learn the objects to the repository using the shared object repository. If you already created the local object repository and you want to convert it into a shared object repository then QTP provides way to convert it thus making it a shared object repository and different users can use the object repository.


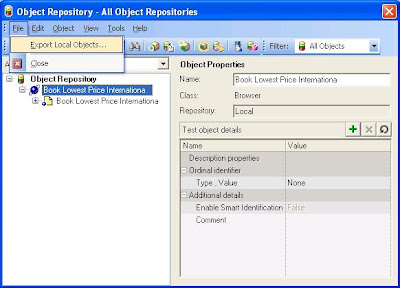
Step 1: Open Object Repository either by navigating to Resources > Object Repository or by clicking Ctrl+R. The "Object Repository > All Object Repositories" window will be open with the object’s loaded.

Step 2: From the "Object Repository – All Object Repositories" Navigate to File > Export Local Object… or you can use Alt+F shortcut key and select "Export Local Object…"


Step 3: In the "Export Object Repository" window select the location where you want to save the .tsr file and give the file name and click save button.


Step 4: A copy of the Local Object Repository is now created as a shared object repository.

Associating a Shared Object Repository to the Current Test in QTP 9.2

Once a shared object repository is created i.e the .tsr file it has to be associated to the current test other wise the objects cannot be identified and hence your script do not work because for your current script there won’t be any object repository associated. Shared Object repository is where you store your information in a central place and different users can access the repository. It is to be noted that by default the shared object repository will be in read only mode.


In order to associate the shared object repository we need to perform the following steps.

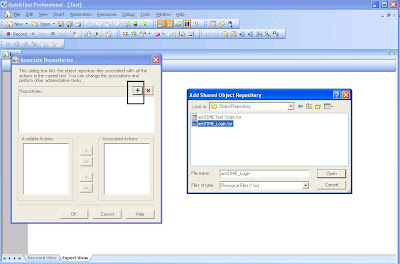
Step 1: Navigate to Resources > Associate Repositories. The "Associate Repositories" window will be opened.


Step 2: In the "Associate Repositories" window Click the "+" button which is in green color. The Add Shared Object Repository Widow Opens. Here you can select the path of the .tsr file and click Open Button.


Step 3: In the "Associate Repositories" window under the "Repositories" frame you will be seeing the path of the .tsr file highlighted and also in the "Available Actions" frame you will see "Action 1" displayed.


Step 4: Now select the "Action 1" and click the right arrow button. The "Action 1" will be shifted to "Associated Actions" frame and click "OK" button. This means that the shared object repository is now associated to the current test.


Step 5: Now open the Object repository by navigating to Resources > Object repository or Press "Ctrl + R". The "Object repository > All Object repositories" window will be opened and you can see the objects listed in the window under Action 1.

Note: When you use a shared object repository in your current test as associated repository the objects and the properties are read only which means you cannot change the object & properties names, values.


If you add any objects from the application under test to this repository then they will not be added into the shared object repository but will be added in the local object repository and you can manage them but if you try to export the objects it will create a new shared object repository and only the object added locally will be stored in the new .tsr file.


Look in the image and the highlighted object and properties. The object identification for this object during run time happens for this current test and you cannot save this object into the shared repository you have associated. Even if you export it will create a new .tsr file and only the object added currently will be saved.

Assignment: Create a shared object repository and associate it to the current test. Now learn an object from the Application and try to export the object repository and see what happens.

How to use a Shared Object repository in QTP 9.2

Object Repository manager in QTP is used to manage a Shared Object repository.

Resources – Object Repository Manager – Add Objects

What is a Shared Object Repository?


Shared Object Repository in QTP is a centralized place where all the object information is stored and will be stored as a .tsr file (Test Shared Repository). The extension of a shared object repository is a .tsr while working in a shared environment with multiple quick test licenses it is always a better practice to use a shared object repository.


How to create a shared object repository?


Open a new test in QTP.

Navigate to Resources, Object Repository Manager. Object Repository Manager Window opens up.


Now start learning objects from the application under test into the repository by clicking the Add Objects Button.


Now save the repository as a .tsr file in to the desired location and folder from where you can access.

Now your shared object repository is ready to be used for your test.

Some quick tips:

1. Add Objects using shared object repository manager to create a .tsr file.

2. Associate the .tsr file to the current test. Note: we can start using a shared object repository only after we associate the object repository to the test.

3. Object Repository manager is used to create/edit a .tsr file.

4. Associate repository is used to associate a .tsr file with the current test.

Frame Work in QTP 9.2

Framework in QTP is a complex internal architecture made easy for the end user. A Frame work follows the set of best practices towards test automation.


Generations in Automation

Generation One: Record and Playback
Generation Two: Linear Scripting
Generation Three: Data Driven Testing

Now from Generation Three we have moved to Hybrid Architecture which contains fileSystemObjects, Excel Application, database, functions & Procedures, Environment variables, Shared Object Repository, VB Script. Generally a Framework will be built on a web application.

More on Frameworks will be posted shortly........

Debugging in Quick Test Professional 9.2

Debugging in QTP 9.2 plays a vital role in analyzing the script when an issue is faced and to correct a script we debug the script to understand where the error is there in the script. Debugging is the process of identifying the errors in the script. With respect to QTP 9.2 debugging should be used in context of functions.


QTP has a debug tool bar and you can set debug tool bar in QTP by navigating to View – Toolbar – Debug.


Debug tool bar contains 6 features. There are 6 buttons in the tool bar and they are given below

1. Pause
2. Step Into
3. Step Out
4. Step Over
5. Insert/Remove Breakpoints (F9)
6. Clear all Breakpoints (Ctrl+Shift+F9)
7. Enable/Disable all Breakpoints.

What is a Breakpoint ?

A breakpoint pauses test execution at a specified line of code. Ideally we need to insert a breakpoint at a function call.

To set a breakpoint in the script you need to do any of the following

1. Click in the left margin of a step in the test or function library where you want the run to stop.

2. Click a step and then perform any of the mentioned step

a. Click the Insert/Remove Breakpoint button.

b. Choose Debug > Insert/Remove Breakpoint.

The breakpoint symbol is displayed in the left margin of the test or function library.

Step Into

When Step Into is clicked the execution control pauses at the first executable line within the function. After creating a breakpoint you need to use a step into to enter a function. After this you can either select step over or step out to execute the rest of the function.

Step Out

Step Out would execute all the lines within a function at once and the execution halts at the next function call.

Step Over

After we step into the function body Step over would execute one line at a time and pauses. The test would pause even at the end of the function. We can add variables to watch using the Step Over feature.

If a variable is added to watch we can observe the trend of the variable during execution. We need to use step over to do so.

/* Tynt Insight tracker ----------------------------------------------- */