| Previous | 1 | 2 | 3 | 4 | 5 | 6 | 7 | 8 | 9 | 10 | Next |
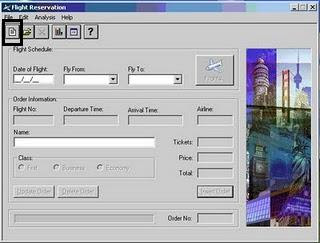
We will learn to record in Context Sensitive Recording mode in QTP 9.2 and will use the built in Flight reservation Application which comes along with QTP 9.2 for learning. If we do not select any recording mode then QTP will take Context Sensitive Recording Mode by default.
You should also launch the Flight Reservation Application and enter the User name and Password. The user name for the Flight Reservation Application should be a string having a length more than 4 and the password is mercury. The Flight Reservation window is opened and you are ready to insert an order.
Before doing it let us look at how to record the actions using QTP 9.2
1. Launch QTP 9.2
2. Uncheck all the add ins in the Add in Manager window and click OK
3. Select the blank Recording option in the Next Screen.
4. The main window to record the script is open.
5. Click Record button on the tool bar or you can select Automation in the Menu Bar and click Record Option or you can press F5 key from your keyboard function keys.
6. Now Record and Run settings window will be opened.

In this window select the “Record and Run Test on any Windows based Application” Radio Button and click OK button.
7. In the main screen if you see the recording starts and in the status bar in the bottom of the window you will see the “Recording” message in red Color.
8. Make the “Flight Application Window” Active.
9. We will record only valid steps to insert an order in the “Flight Reservation Application”

10. Click the New Button which is under the File menu and is the extreme left Button. A dialog box opens asking whether to save or not. Click No. Now you can insert a fresh order.
11. Use only mouse to select different fields. Enter the Date, then Fly From, Fly to. Now the Flight button will get enabled. Click the FLIGHT button and a dialog box will open select the flight and click OK.
12. Then enter your name and click Insert button. The order is inserted.
13. Click Stop button or Go to Menu, then Automation and Click Stop Recording or Press F4 Function Key in the keyboard.
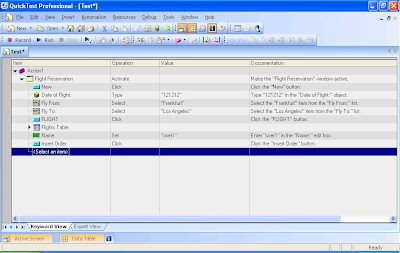
14. In the QTP main window you will look a script like this.
Window("Flight Reservation").Activate
Window("Flight Reservation").WinButton("New").Click
Window("Flight Reservation").WinObject("Date of Flight:").Type"121212"
Window("Flight Reservation").WinComboBox("Fly From:").Select "London"
Window("Flight Reservation").WinComboBox("Fly To:").Select "Paris"
Window("Flight Reservation").WinButton("Flight").Click
Window("Flight Reservation").Dialog("Flights Table").WinButton("OK").Click
Window("Flight Reservation").WinEdit("Name:").Set "Test User"
Window("Flight Reservation").WinButton("Insert Order").Click
15. Now Play back the recording by clicking the play button or Go to Menu, then Automation and Click Play or Press F5 Function Key in the keyboard.
16. QTP will replicate all the actions performed by you and will insert an order.
Note: Each time an order is inserted it makes an entry in the Data base and so the Order Number is incremented by one.
17. Look at the Key Word View and you can actually see all the steps you performed.

| Previous | 1 | 2 | 3 | 4 | 5 | 6 | 7 | 8 | 9 | 10 | Next |
0 comments:
Post a Comment