| Previous | 21 | 22 | 23 | 24 | 25 | 26 | 27 | 28 | 29 | 30 | Next |
Standard Checkpoint captures the expected properties and Property values of an Object while recording. During run session if the actual property value matches with the expected property value then it returns a pass to the test result or fail to the test result.
How to insert a Standard Checkpoint in QTP 9.2
To insert a Standard Checkpoint within the script then Press Record button, Navigate to Insert in the file Menu and select Checkpoint and Standard Checkpoint.
 Once you select the standard Checkpoint by navigating or by using F12 key there will be a hand sign and you need to point it on the object on which you want to create a checkpoint. For us to understand we will use the Flight Application and click the FLIGHT Button. Once you click on the FLIGHT Button you will be displayed with the “Object Selection-checkpoint properties’ dialog box. Click OK on it.
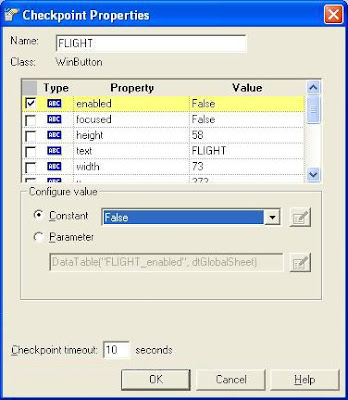
Now you will be displayed the ‘checkpoint Properties” window where in you can Select the Properties and values on which you want to create the check point and the checkpoint timeout. We will only select the Property as Enabled and Value as False.

Now in the Expert View the script recorded is as follows.
Window("Flight Reservation").WinButton("FLIGHT").Check CheckPoint("FLIGHT")
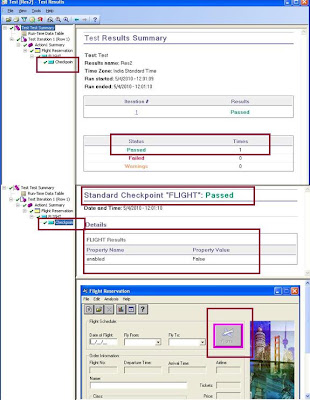
Now run the script and see how the test result is displayed.

Now just see how the Checkpoint will pass the result as fail when you just enter date of flight, select Fly from and Fly to Combo box values then the FLIGHT Button will be enabled. Now re run the same script the test result will show as fail because the property value while recording is false and while playback is True.
| Previous | 21 | 22 | 23 | 24 | 25 | 26 | 27 | 28 | 29 | 30 | Next |
2 comments:
EXCELLENT SITE FOR GETTING KNOWLEDGE QTP
The Microsoft Power BI Training equips you with skills in data modeling, DAX calculations, and interactive dashboard creation. Learn to transform raw data into actionable insights for smarter business decisions.
Post a Comment